A few years back I found a “new to me” mushroom, but all the references say inedible, which does not mean toxic, but as per Wikipedia: “Inedible mushroom species may be those of very poor… More

A few years back I found a “new to me” mushroom, but all the references say inedible, which does not mean toxic, but as per Wikipedia: “Inedible mushroom species may be those of very poor… More

Erdbeerkuchen in Germany is the messenger that summer is on its way. Once strawberries get ripe bakeries and grocery stores will sell prebaked sponge cake exactly for this purpose. Baking your own sponge is… More

Over a hundred different species of sumac grow all around the world. You can often see these hardy shrubs growing in colonies on dry roadsides. In the fall when their leaves turn bright red they… More

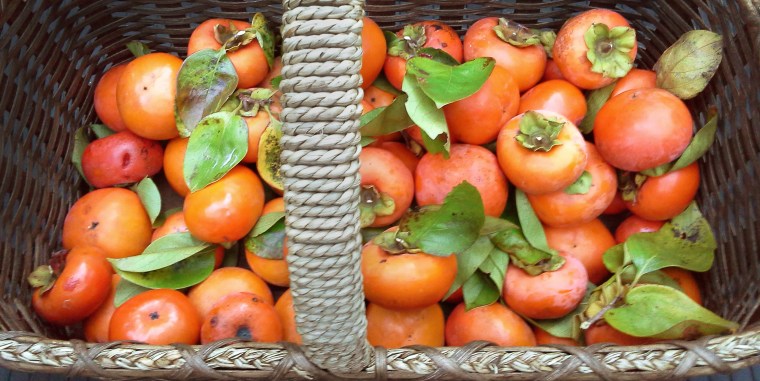
Autumn is the color orange, orange like pumpkins, sweet potatoes, and persimmons. While most regard apples as the quintessential fall fruit, for me it is the persimmon and we live a little too far south for apples to do well anyway.

The scientific name for the persimmon tree is Diospyrus from ancient Greek meaning divine fruit. Persimmons are one of the oldest cultivated fruits and are originally from Asia. Looking at the picture above you can see how far the persimmon as evolved through selective breeding. The fruit on the left is a non- astringent, seedless Japanese Fuyu Persimmon, the one on the right is an American native persimmon, which usually contains 5 or 6 seeds.
I have to say I love both. Generally, there are two types of persimmon fruit: astringent and non-astringent. Astringent persimmons have a “chalky” or bitter taste unless they are very, very ripe and mushy. Native Persimmons are always astringent and it takes some unpleasant eating experiences until you learn when they are really ready to be eaten. A few good tips are: Wait until they fall off the tree. When you pull the leaf (calyx) off the top of the fruit, it should come off easily and no part of the fruit should be attached to the leaf. The skin is probably a little wrinkled. The last part of the fruit losing its astringency is right under the leaf. You can touch that part with your tongue and wait a few seconds to see if you get the unpleasant chalky sensation before you stick the whole fruit in your mouth. Should you eat a not quite ripe persimmon, make sure you have a truly ripe one to eat afterward, it will take the unpleasant sensation from your mouth; otherwise, you are stuck with that feeling for a while.

Another note on eating wild persimmons: They are quite seedy and the flesh sticks to the seeds, just keep the seeds in your mouth and slowly nibble the flesh off the seeds. You can eat the skin, it is very thin. Even the 17th century Capt. John Smith, of Jamestown fame, said that if a persimmon “is not ripe it will draw a man’s mouth awry with much torment.” Yes, all that is totally worth it because they are so good. They taste a little like plums, but sweeter and they have a hint of cinnamon and dark rum. To me, they already have all the flavors of Thanksgiving desserts in them already.

Native Americans cherished the fruit and dried most of it for the winter. The word Persimmon comes from Powhatan (Algonquian) “pasimenan ” meaning dried fruit. They also mixed the pulp with grain to make a sort of bread and brewed alcoholic beverages from persimmons.
Nutritionally persimmons are a great source of Potassium, an essential mineral for maintaining normal blood pressure and heart function.
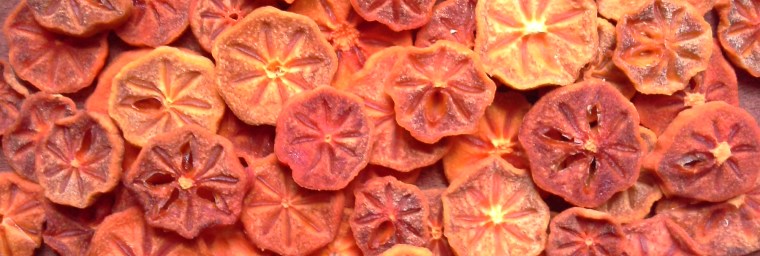
The large Asian persimmons are a delight to eat fresh. The non-astringent varieties can be eaten like apples, or you can wait until they get delightfully soft. But they are even better dried, I spend a few days each fall drying as many as I can get my hands on. You can dehydrate both varieties astringent and non-astringent, when ripe but still firm. The tannins are lost during the drying process.
The small native Persimmons are great for baking, you can use the pulp in place of ripe bananas. I have been making this Persimmon Cookie recipe for about 15 years now and I look forward to making it every fall.

The best way to separate the pulp from the seeds and skins is with a food mill, if you don’t have one, it is best to use a mesh strainer and the back of a wooden spoon, this is quite labor intensive, but you only need 1 cup of pulp for the cookie recipe. About 20 ounces of wild persimmons should give you enough pulp to fill one cup. If you don’t find enough wild persimmons in a couple of days to make the cookies, you can just freeze the ones you find and keep adding to the frozen ones until you have enough. If you want to make this recipe with cultivated persimmons, you need about 3 very soft fruits.

Ingredients:
1 cup persimmon puree
1 cup sugar
1/2 cup room temperature butter
1 teaspoon baking soda
1 egg
2 cups flour
1/2 teaspoon each of cinnamon, salt, cloves, nutmeg, and allspice
1 1/2 cup of raisins
1 1/2 cup of pecan pieces (walnuts are also great)

Instructions
Set 1 stick of butter out to come to room temperature
Produce 1 cup of persimmon puree one way or another
Preheat oven to 375°F
Prepare a cookie sheet by either greasing, with a sheet of parchment paper, or with a silicone mat
Put the persimmon puree, the sugar, the butter and the baking soda in a dough bowl and beat with a mixer until creamy

Add the egg, the flour, sifted spices and mix until incorporated
Incorporate the raisins and nuts
Drop by the spoonfuls onto the baking sheet and shape the cookies a little with a wet spoon, since they don’t run when baked. I push them down a little, so they are not so tall
Bake at 375°F for 12 to 15 minutes until golden brown

They are best when they are fresh, if they make it to a few days old, they are better if reheated in the toaster oven. They are a little bit like muffins in their consistency.

Of course, we are not the only ones who enjoy the persimmon fruit
My friend Tim Anderson sent me a note after reading this post:
My father C.H. Anderson was a Chief Purser aboard Pan American World Airways from the Flying Boat era through to the Boeing 747. He was very adept at languages and flew on very many flights to the PI, Nippon, Hong Kong, Saigon etc. especially the R&R flights of soldiers, Marines, and Navy from Tan Son Nhut Air Base to Bangkok and Hong Kong.
He was very fond of eating local foods where ever he went; he loved Vietnamese Persimmons and tried to bring one home for my mother but the inspectors at LAX wouldn’t let him bring the fruit into the country (in fact they trashed his persimmon).
Not one to be stymied by officials, on his next flight to Viet Nam he ate a persimmon swallowing the seed as well just before departure from Tan Son Nhut.
Arriving home in California he instructed me to “Cut a piece of Hardware Cloth (aka wire mesh) to fit in the toilet bowl and draw a bucket of hot water”. I followed his instructions and he went in to evacuate his bowels. Soon we could hear him pouring the hot water into the toilet bowl and his exclamation of discovery when the seed appeared in the hardware cloth.
Then he told my brother Matthew to dig a hole in the front yard and prepare for planting.
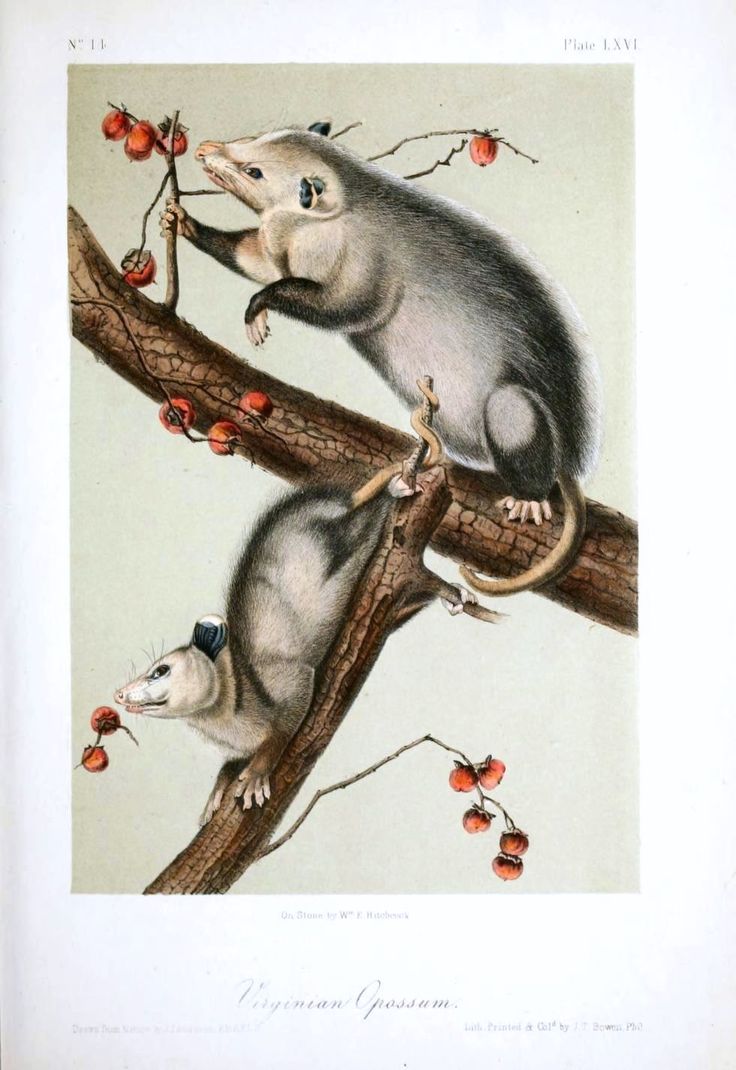
As my father carried the seed out and planted it he told us that “persimmon seeds must pass through the intestines of a mammal in order to sprout, that across the southern U.S. where ever you see a persimmon growing a possum has shit there”.
Well, the seed sprouted and grew into a beautiful tree, bountiful with fruit that we all enjoyed. My mother, Anita Swan Kramer Anderson, made wonderful jams, cakes etc. for us.
When Saigon fell 8 years later on April 30, 1975, many Vietnamese refugees resettled into Westminster, California bringing their traditions and culture to share with us.
When our tree was loaded with fruit, we would be visited by sweet little old Vietnamese ladies asking for fruit from our tree! Our mother taught us to share, so we did.
Years later, after our parents had passed, I put the house on the market and that persimmon tree sealed the deal with the Viet-American woman who bought the place.
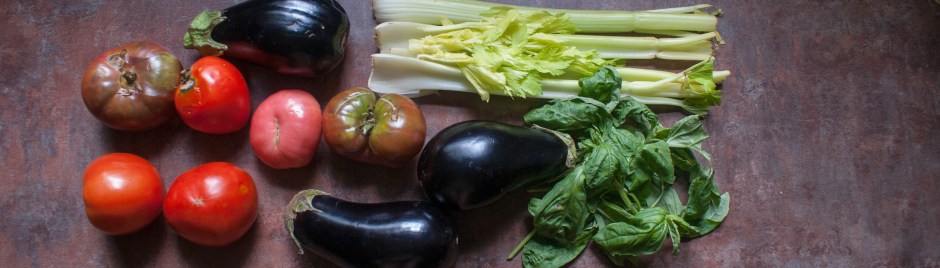
Caponata a light and refreshing summer dish from Sicily, makes use of all the vegetables that are plentiful in the summer, sending you on an imaginary trip to the South of Italy, where meals are long, everyone seems to talk at the same time, and cooking and eating are both an art. When visiting with my friends Luigi and Lucia in their garden cottage in the lovely Lepini Mountains outside of Rome, Luigi had prepared this dish as an appetizer for us and I was smitten with this sweet and sour dish, that is such a great complement to fresh Mozzarella.
1 ⅓ lbs eggplants, large dice
3 stalks of celery
½ lb white onion, large dice
2 lbs of fresh tomatoes, diced and drained
1 bunch of fresh basil
2 ounces of green olives
2 tbsp capers
5-6 tbsp white wine vinegar
7 tbsp olive oil
2 tbsp sugar
Fresh ground pepper and salt
You might want to have a bottle of red wine, some crusty rustic bread and fresh balls of mozzarella at hand.
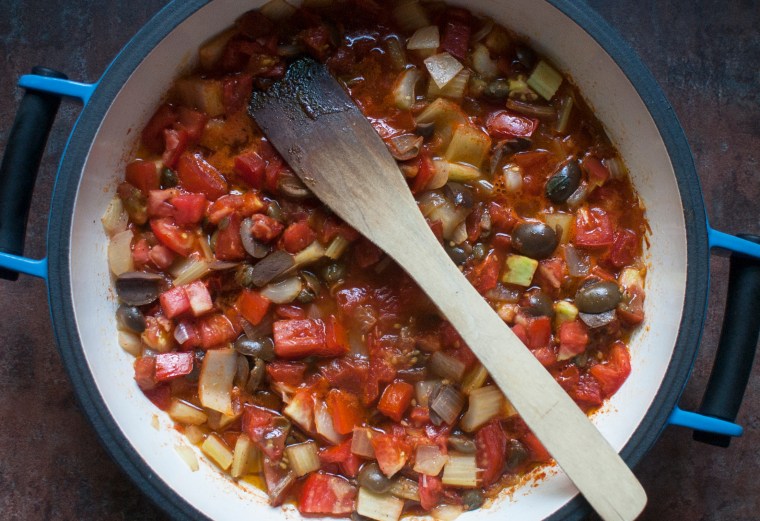
Place diced eggplants in a colander and sprinkle with salt, mix to coat evenly, leave to drain for an hour. But you don’t have to wait, you can proceed with the recipe.
Cut celery stalks into ½ inch long pieces, save and chop the celery leaves.
Cut onions and tomatoes into large dice. Drain tomatoes and save the juice for something else (i.e. salad dressing). Remove the pit from the olives and cut each olive into thirds in the process.
Heat 3 tbsp of olive oil in a dutch oven, cook onions until translucent, add celery and cook a few more minutes. Add tomatoes, olives and capers, season with sugar, salt and pepper. Cook for 15 minutes without a lid, at the lowest heat, stirring occasionally while frying the eggplant in a separate pan as follows.
Rinse the eggplant and dry with a kitchen towel. In a frying pan heat the rest of the olive oil on high. Just before the oil begins to smoke, add enough of the eggplant, not to crowd the pan. Fry the eggplant until it gets crispy on the outside.

When all the eggplant is cooked, mix it with the other vegetables in the dutch oven. Add the vinegar and simmer everything together another 15 minutes. Taste for more salt and pepper. Add chopped basil and celery leaves.
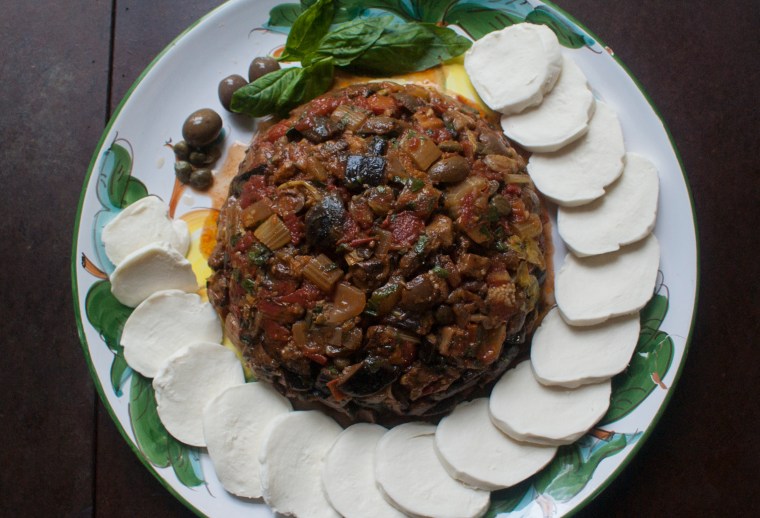
Caponata can be served lukewarm as a side dish, it is great with grilled meat or fish. It also makes a great topping for bruschetta. My favorite, though, is serving it cold with fresh Mozzarella. To do that, pack the Caponata in a glass bowl and weigh down with a heavy plate and refrigerate for a few hours, if you have time, refrigerate overnight, the flavors really meld. To serve, invert onto a platter and arrange the balls of Mozzarella around it. A great dish for lunch or as an appetizer; best served with crunchy rustic bread.
You can alter the recipe with other vegetables like squash or bell peppers. What makes the recipe is the vinegar, the olives and the capers.
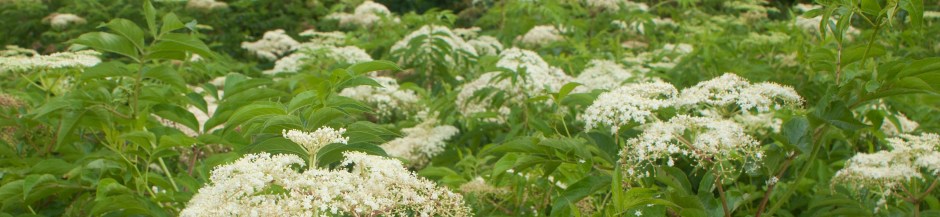
Elder or Sambucus is widespread in the Northern Hemisphere; I see it in ditches and fence rows, often growing in clumps and blooming in May and the beginning of June in the South. I have been gathering the blossoms since I was a child growing up in Germany, where we made pancakes, syrups and a sparkling summer drink. I usually try to find a patch removed from the road, as with any gathering of wild foods. The flower clusters brake off easily, you don’t need any tools for gathering, usually the blackberries are pretty bad in the same area, I would recommend boots and thick pants. You can flick any insects out of the flowers while you are still outside, don’t shake your flowers too vigorously or you might loose a lot. You want to gather the most pristine, open flower heads you can find, they will have the best flavor. Please make sure you have correctly identified the plant, before gathering and using it. I have posted a link at the end of this article for identification.

Do not wash the flower clusters, a lot of the flavor is in the pollen. I cut the thicker stems off the clusters, since the leaves, twigs and branches contain cyanidin glycoside, which may produce illness if ingested in sufficient quantities. I also remove any blossom which a wilted/brown already, which are usually at the margins of clusters and can easily be cut away with scissors.

Ingredients:
Heat and stir the first three ingredients until dissolved in a pot you won’t need for the next few days. Remove the yellow part of the lemon rind (zest) with a vegetable peeler, peel the lemon and discard the white pith. Slice the peeled lemon. Add the lemon and zest to the sugar water; once cooled down, add the elder flowers and cover to keep insects out. Steep for three days, strain and bottle the syrup. Keep the syrup refrigerated. It tastes great with a dry champagne/prosecco or sparkling water. I would recommend a ratio of 5:1.
Other uses for the syrup:

Ingredients:
Heat a little of the water in a sauce pan to dissolve the sugar. Pour the sugar water and the cold water in a non reactive (glass, enamel, plastic) container. Remove the yellow part of the lemon rind (zest) with a vegetable peeler, peel the lemon and discard the white pith. Slice the peeled lemon. Add the lemon, the zest and the flowers to the sugar water and cover to keep insects out. Leave at room temperature for 24 hours.

You can stir it a few times to make sure all the blossoms are submerged. Filter all the solids out and bottle in swing top bottles. Leave the bottles at room temperature 2-3 days. But let extra gases out every 8-10 hours. This is where the dangerous part comes in. If you don’t burp your bottles regularly, you have a ticking time bomb. If you have too much pressure built up to burp the bottles without loosing all the contents, you can refrigerate the bottles first and then set the refrigerated bottle in a bowl to catch any overflow. If you are not very good at remembering to burp your bottles regularly, set them in a place where they won’t kill anyone in case they do explode. That all said you can probably tell by now that this makes a great sparkling drink reminiscent of Champagne. It might have a small amount of alcohol, but not enough to get you drunk at least at this stage of fermentation. After 2-3 days you can start tasting your brew and refrigerate it when it is nice and bubbly and you like the flavor. I like drinking mine fairly quickly, I don’t think that the flavor improves with age as it does with wine.

Ingredients:
You can put all the ingredients, but the flowers in a blender to make the batter, or you can beat it by hand until the lumps are gone. Let the batter rest for 20 minutes, or longer. If you let it rest longer, cover it and put it in the fridge. Heat a frying pan or griddle to medium high and grease it with some butter. Hold a flower cluster by the main stem and dip it in the batter and then place it in the pan. While the first side of the pancake is browning snip all the stems off with a pair of scissors. Once the edge of the pancake looks cooked flip it over and brown the second side. Since Blueberries are ripe at the same time, I served the pictured batch with blueberry syrup and powdered sugar, a very yummy combination.

Remember that Elder Blossoms turn into Elderberries, another delicious, nutritious wild food; so don’t pick all the flowers.
Links:
Identification www.ediblewildfood.com/elderberry.aspx

Going to the grocery store, it sure seems like all fruits and vegetables are in season year round now, which at first glance appears to be a blessing. We now can eat all our favorites year round; but at the same time we realize that most produce has lost it’s flavor and appeal. If you do some research you might find that many items in the produce isle are months old and have been bred for long shelf life and handling toughness. It can be quite mind boggling to think of all the energy that goes into transporting, cold storing, preserving through atmosphere alteration and irradiation of most of our produce. Besides all that, I fondly remember strawberries coming in season when I was a child; and how we ate all the strawberries we could, because we knew they would be gone again in no time. And it wasn’t just strawberries, it was true for most produce.
For all these good reasons we try to eat local and in season as much as we can. In the early winter when citrus is at it’s peak on the Gulf Coast, I usually buy a bushel each of various citrus fruits from a grower near New Orleans and we keep these bushel boxes in the cool garage all winter long. When I first bring them home everyone eats clementines, grapefruits, tangelos and oranges to their heart’s content, but later in the winter we are all getting tired of citrus fruits and the last ones start drying up or rotting.

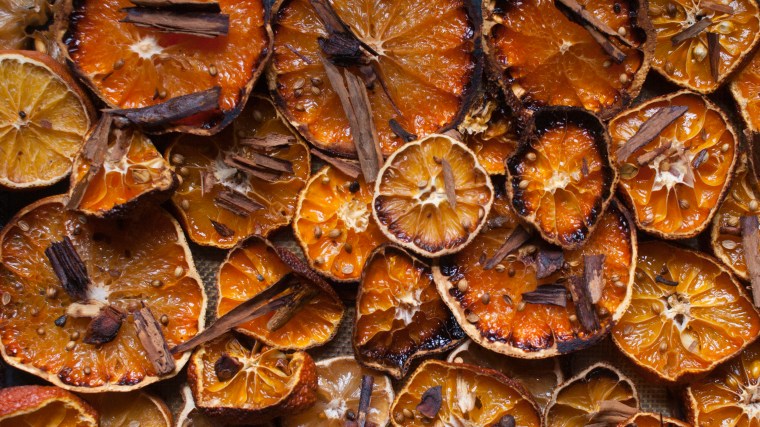
I could get on my second soap box and talk about “food waste”, but I might save that for another time. So, rather then letting the last citrus go to waste, I love making an Italian Soda Syrup from it.
Growing up in Southern Germany, I fell in love with a bitter orange soda when I was a child traveling to Italy often on short vacations: Chinotto was the Italian’s answer to Coca Cola, with a slightly bitter, not so sweet taste; made from local Chinotto oranges. The same fruit is used for Campari and other French and Italian sweet and bitter beverages. A few years ago I found a recipe for homemade Chinotto and it surely has brought many happy childhood memories back.

Since I don’t have any Chinotto oranges, a good variety of citrus fruits does the trick. It is best to stick with more sour and bitter varieties. Nevertheless, today I will use what I have left in my garage, especially since our local farmer Sam harvested the first strawberries yesterday. When using old fruit like that, make sure it still looks and smells good on the inside. And since we are using the whole fruit, you don’t want any fruit that has been treated with chemicals.

Chinotto how to:
Preheat your oven to 375°F. Roughly slice the fruit and place it on a baking sheet or two and liberally sprinkle it with cinnamon sticks, coriander seeds and a little nutmeg. These are the most important flavors. I also like to add a little: allspice, anise, cardamom and pepper. Put your baking sheets in the oven and bake until the sugar in the fruit caramelizes and the edges begin to look burned. In the meanwhile make a Simple Syrup. You are going to need enough to submerge your fruit in the syrup. To make Simple Syrup heat equal amounts of water and sugar and stir until the sugar is dissolved.
Fill a large glass jar with the roasted citrus and spices, and pour in enough syrup over the fruit to cover it completely. You can place a small jar on top of the fruit, to make sure it stays submerged. If the fruit does not stay submerged it will mold and all your efforts will be wasted. Keep the syrup in the refrigerator and in a few weeks you can start straining some off and enjoying it with sparkling water.

Chinotto is also a nice base for some mixed drinks. Here is a simple one: www.saveur.com/article/recipes/Sotto-Chinotto
Once we can enjoy the hot summer days again, I’ll be glad to have a stash of my Chinotto Syrup in the back of my fridge.
Saluti
Wild foraged foods are just my favorite; they are packed with nutrients, super fresh, picked at prime and of course free. Wild foods are usually more nutrient dense, since they grow under optimum conditions. They have not been bred for centuries to have other attributes, like higher sugar content, longer shelf life etc.
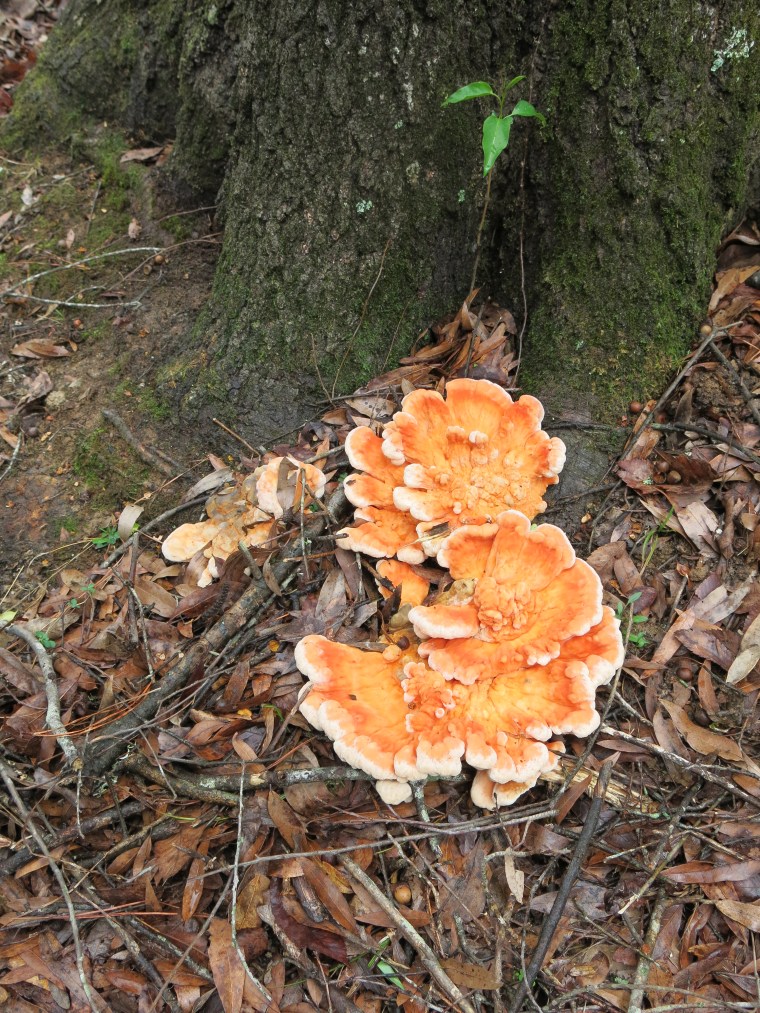
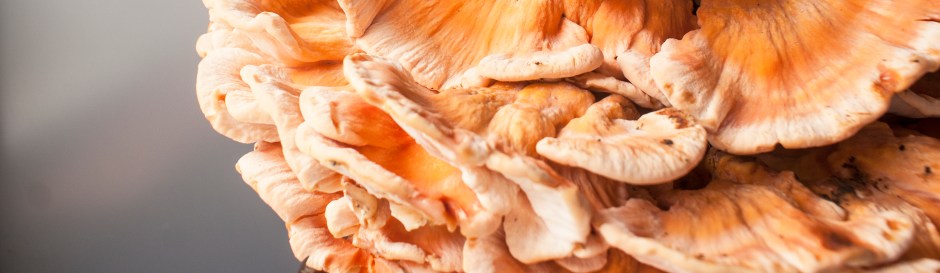
You can imagine my delight when I spotted a very large bright orange mushroom, while walking our dog, from the road. I took some photos and a small sample and went home to properly identify it. It turned out to be what is commonly know as Chicken of the Woods, or Laetiporus cincinnatus by it’s Latin name. Not just edible, but described as choice. I went back and picked three clusters, the largest weighed almost seven pounds. I shared it with several friends and a lot of mushroom cooking ensued in my kitchen.
It is named Chicken of the Woods, because of it’s texture and mild flavor. It does not taste like chicken, but can very easily be substituted for chicken in lots of recipes. Since it is so mild, one has to be careful not to overpower it with other flavors. It should not be eaten raw.

The underside has very fine white/yellow pores and since it grew from the base of the tree it engulfed sticks and leaves around it. The older the mushroom gets the tougher it can be. This one was was quite fresh and all the parts were very tender.
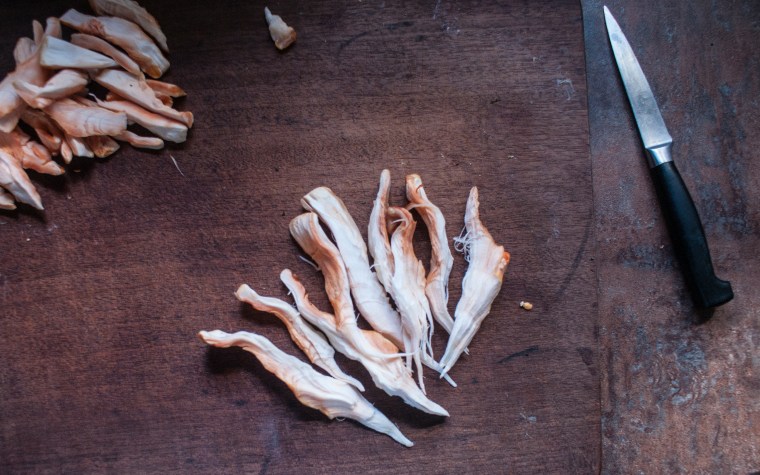
You can tear the mushroom apart just like you would chicken. If the thicker parts are a little tough you can cut them into cubes and cook them longer in stews or soups. In general this is a very dense mushroom, it does not loose much volume when it is cooked.
I sauteed some for a stir fry in ghee, very yummy. I also used some for a curry in place of meat.

Since I had so much. I also put quite a bit in the freezer. The best way is to cook the mushroom first and then freeze it.
After all this, I was inspired to create my own recipe. I kept thinking that it reminded me a little bit of crab meat. So I decided to create a “Mock Crab Cake” with the Laetipurus as my crab. Since the mushroom flavor is so mild, I wanted to add a fishy umami flavor . I love creating new spice mixes and recipes. I am not expecting you to have all these things at home and to follow suit, this is more of an armchair cooking post.
Umami, or savory is a taste associated often with fermented vegetables, meat, fish and dairy. Think of a ripe brie or Worcestershire Sauce. Our desire to enhance those flavors brought on the artificial MSG, which replicates the natural amino acids that break down in foods during cooking or fermentation.
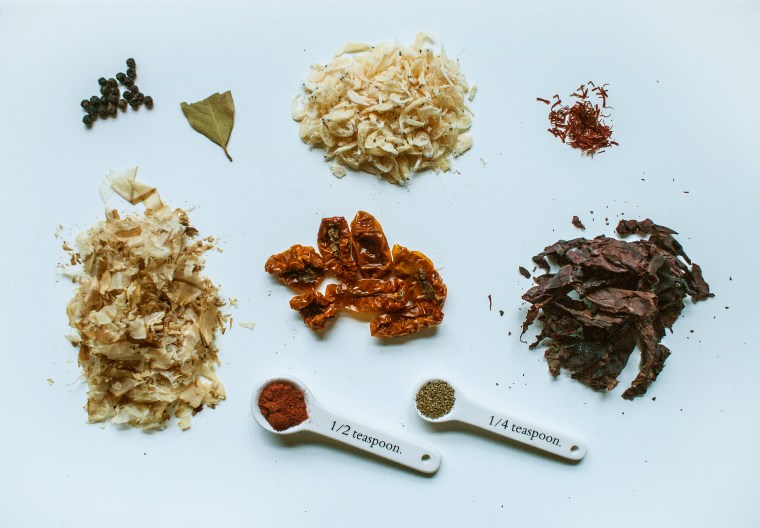
For these crab cakes I chose: black pepper, bay leaf, tiny dried shrimp, saffron, katsuobushi (dried tuna flakes), sun dried tomatoes, dulse seaweed, smoked paprika and celery seed. I wanted to bring the fishy flavors and also a little of Old Bay seasoning into the mix. Since these flavors are complimentary I did not measure anything. Next I ground all this in the coffee grinder and gave it a taste test; yummy.
Mock Crab Cake
In the past people have invented “mock” or “faux” recipes for keeping up with high society, when they couldn’t afford the ingredients, like Mock Turtle Soup. In more recent times these terms are more common when vegetarian dishes mock a certain meat.
this recipe is for 1 mock crab cake
equipment: grater, wax paper, small ring mold, frying pan
1 cup flaked Laetiporus
1 egg beaten
1 heaping tbsp mayonnaise
1 tsp rice syrup, crab meat is always a little sweet, you can use sugar too, just a little less
1 tbsp grated shallot; if you substitute onion, run some water over it, to take the edge off
2 tbsp umami seasoning; you could substitute 1 tsp Worcestershire Sauce & tomato paste
2 tbsp bread crumbs on a piece of wax paper

Tear the mushroom to resemble crab meat, you need about a cup. Mix egg, mayonnaise, syrup, shallot and seasoning. Taste it, see if it needs anything, like salt. (don’t taste it raw if you don’t know where your eggs come from) Add the mushrooms to it.

Grate some stale bread onto a piece of wax paper, set a ring mold (this is just the top ring off a plastic drink cup) on top of the breadcrumbs and fill it with the mushroom mix. Sprinkle the remaining breadcrumbs on top. Lift it with the wax paper onto a plate and refrigerate for 15 minutes.

Heat a pan to medium with some butter, or what ever oil you like and gently fry the patty on both sides. Serve with lettuce. Make sure the patty is not so thick that the middle stays raw. You can shape the patty by hand too. The time in the refrigerator helps with moisture distribution and firming up the patty, you can leave it in the fridge longer.
The outside was nice and crunchy, the inside soft, with a nice texture to it. The taste was reminiscent of crab, but of course not identical. I will definitively make these again, even oyster mushrooms should work great with this recipe.

I am not an expert on mushrooms and I urge you to be very careful picking wild mushrooms. I usually stick to the species that don’t have poisonous lookalikes. Please don’t use this blog post for identification.

If you are what you eat, then we should eat the best we can be.
I am very grateful that my husband likes to hunt. A few years ago, as we were getting more self-sufficient and leading more of a homesteader’s life, my husband had just shot his first deer of the season, and I marveled at the animal, as he was gutting and skinning it, and wondered why we always got, what seemed so little, back from the processor and still had to pay about $1.50 to $2.00 a pound. That year we decided to tackle a new challenge to learn how to butcher venison with the help of Youtube videos. Now that I have butchered quite a few deer each year, I can really appreciate the cost processors charge and see why so much is wasted.
This will not be a post on how to butcher venison, but on how to make the most of it, once you decide to do it yourself and to give you a brief glimpse of what it is like. I also want to share some details you might not find so easily otherwise. I encourage you to butcher an animal yourself, it is very satisfying and empowering. It is not hard, I always tell people it is just a reverse puzzle, and there are many good videos and tutorials online these days. It does take time, especially if you are not proficient, which is hard to become, since a lay person isn’t butchering on a daily basis, but more on a twice a year basis.
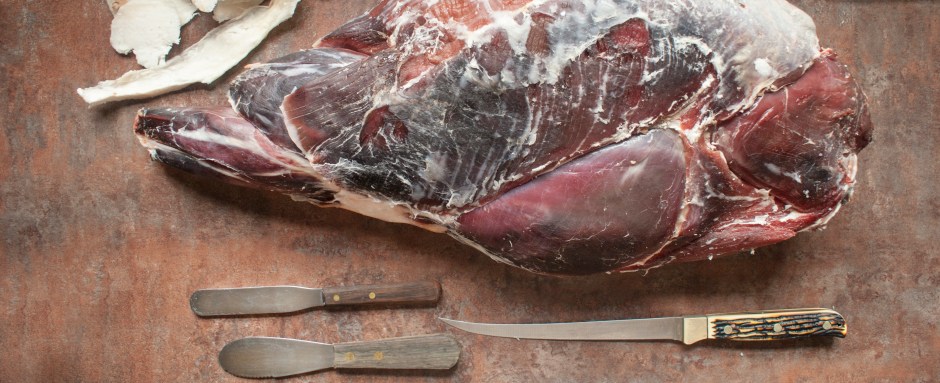
I want to explain on how to make the most of your animal using a venison hindquarter.
The day of the kill, my husband guts and skins the animal and cuts it into quarters, which we then put in our extra fridge to let the meat age. The innards get used right away and we have tanned a few of the hides. This hindquarter had been aged for 10 days, which helps tenderize the meat. Not all deer carry this much fat, but it helps keep the meat moist during aging.
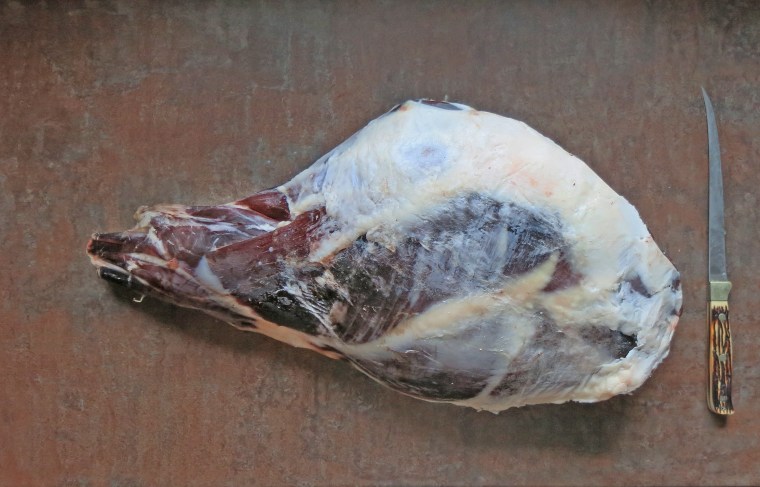
The first step is to remove as much fat as possible, so you can see where the muscle groups lie.

I am also showing you my favorite tools: A fish filet knife, a mayonnaise knife, a butter knife and a small cutting board. The filet knife has a thin flexible blade, which helps with cutting along curves, the other two knifes help with separating layers, or meat from the bone without cutting anything.

Once you identify the muscle groups, you can start pulling them apart with your fingers and the help of your knifes. I am holding the sirloin tip in my right hand and the bottom round in my left.
In regular meat butchering, cuts are made and not muscle groups separated so much, which results in meat cuts that are not uniform. Take the T-bone Steak for example, it has a New York Strip on one side and a Tenderloin on the other side. I like using each muscle separately, because it will all cook the same, have the grain in the same direction and have the same tenderness all throughout.
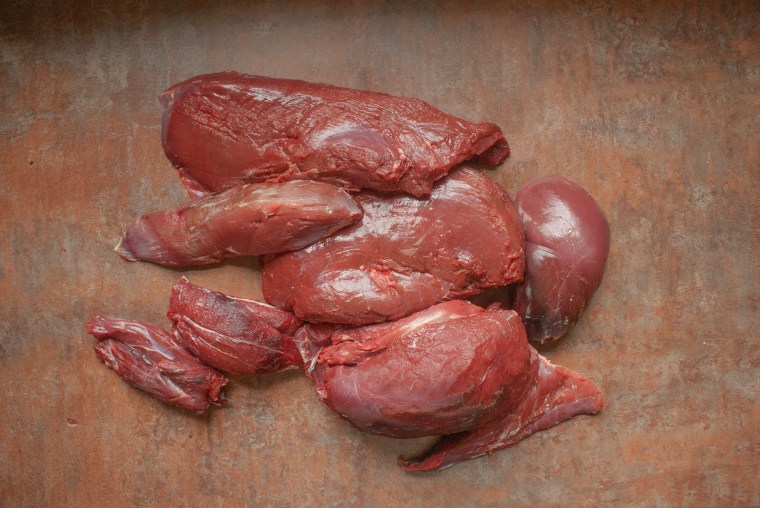
These are the whole hindquarter muscle groups: Bottom Round, Eye of Round, Top Round, Top Sirloin, Shanks, Sirloin Tip and Tri-tip. Except for the shank, these are all fairly tender cuts as long as they are cooked correctly. The Eye of Round (long narrow piece) is excellent in stir fry. The Tri-tip (bottom right) is a great little steak, all the other cuts are great for stew, roasts or cutting into steaks.
And this is everything else:

The outside of the hindquarter can become dry in the aging process, but if you have a cat or a dog, they will love those jerky like pieces (top right) trimmed from the outside, which make excellent treats.
Venison tallow (that is what the fat is called) is very hard and dry and not pleasant to eat, it will coat the roof of your mouth like wax, but it is an excellent skin moisturizer. It makes excellent salves, lip balm and candles. When a deer does not have much fat, you can brush the quarters with melted venison tallow, to keep the meat moist, before aging it.
Any meat cuts that are small or too tough will get ground for hamburger. I usually don’t grind any fat with it at that point; unless I am making sausage, then I will add about 20% pork fat. The hamburger will be lean, I will add more olive oil, bacon grease, or butter as I am cooking it.
The bones will make a wonderful bone broth, which can later be used for any soups, stews, rice, etc. Bone broth is rich in protein, gelatin and also contains trace minerals.
As you are butchering away, there is always scraps to be cut off: sinew, large blood vessels, ligaments, skin, etc. (bottom right, photo above) I will grind it into pet food and freeze it in plastic bags.
Often you can pull the fascia off the muscles (white pile on the right), it feels like vellum or parchment paper, for a good reason, these papers use to be made from it. It also makes good pet treats.
Lastly you can pull out and save sinew, which you can use in craft projects, it is incredibly strong.

A whole deer will yield about 3 gallons of this beautiful bone broth, you can either can it or freeze it. On the right you can see a pot that is ready to be cooked. The aromatics I used are: Thyme, Bay Leaf, Garlic, Salt, Juniper Berries, Shiitake and Apple Cider Vinegar. The vinegar helps extract the minerals from the bones, but you don’t want to use so much that you can taste it. Venison is a woodsy kind of animal, so I like using woodsy aromas in my bone broth.
As far as the fat goes, it will render easier, if you grind it first. I like rendering in water, in a crockpot on low, for a few hours.

Once the fat has rendered you can strain it through cloth or a metal coffee filter, while it is still hot, and almost all impurities will be removed.

Once it has cooled, I usually scrape the last impurities from the bottom.

Vension Dog Treats drying in the sun
There is a lot more to write, but I will save that for another blog, or two. I hope to have inspired you to do some processing yourself.

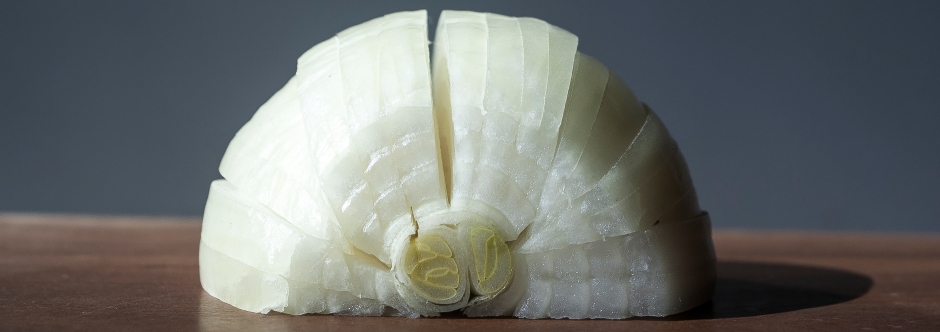
As far as we know the Sumerians in present day Iraq were the first to perfect the stone arch. Only one of these arches still stands today in the ancient city of Ur, estimated to be 4,500 years old.


Later on ancient Romans and Greeks perfected the design, still seen today in many aqueducts and this arch over the entrance tunnel to the first Olympic stadium build around 600 B.C.
All this was going through my head one day, as I was again pondering, while cutting onions, why we always strive to cut round vegetables into cubes. I have watched respected chefs dice an onion, and I was never happy with that technique. There was always side pieces of onion lost and it was hard to hold onto the pile of onion, once it had been sliced top to bottom and then again horizontally.

While trying to think of a more even dice of concentric circles, I came to the conclusion of cutting these layers in a radial pattern, which is not just more even, it is also much more stable. And here is where the ancient Sumerians and their stone arch comes in. When you put pressure on the stone arch (weight of the stones) or the onion, it actually holds together, as in gripping the onion with your finger tips and putting pressure on with your knife.

Long story short, it is easier and you get a more even dice.

Nutrition
The onion’s anti-cancer & anti-inflammatory properties have been more and more bred out in an attempt to make onions sweeter and sweeter, where some of the new sweet varieties have as much sugar as an apple. The best onions to stick with are the pungent ones, yes the tear jerkers and also shallots. As a general rule, fruits and vegetables that are closest to their wild relatives are always more potent in phytochemicals, which can help the body ward off disease. A plants phytochemicals are always greatest on the outer layers, where the plant uses these chemicals to fight insects, disease, unfavorable weather, etc. It is best to peel away as little of your onion as possible. You can always use the outer layers for soup or stock, if they are too rubbery or dry to use. In general pesticide residues on onions are fairly low, so you don’t have to feel pressured to find organic varieties.

If you are cutting an onion not as a flavoring, where dicing is preferred, but as part of your dish, think fajitas or grilled for a sandwich, you might want to cut your onions in strips, long ways.
Don’t cry
To find out more about Phytochemicals check this out http://www.precisionnutrition.com/phytochemicals
